Skip to content


The safest way to pack fragile items for a move is to wrap each piece individually, immobilize it inside a correctly sized box with a cushioning layer on all six sides, double-box anything of high value, then seal with H-tape and label every face. That sequence, applied consistently, is what separates a damage-free move from a box full of broken pieces.
Before you start, gather these right now:
- Double-wall corrugated boxes in two or three sizes (small, medium, dish-pack)
- Bubble wrap, packing paper, and foam sheets
- Void fill (packing peanuts, air pillows, or crumpled paper)
- 2-inch reinforced packing tape and a tape gun
- A permanent marker and pre-printed “Fragile” and “This Side Up” labels
Three quick checks before you pack a single item:
- Press the box bottom firmly with both hands. If it flexes, add a second layer of tape before anything goes in.
- Check that the box is new or near-new. Recycled boxes lose compression strength and are more likely to fail under stacking pressure.
- Confirm you have enough wrap to cover each item at least three full times.
Pro Tip: “Fragile” labels are useful for human handlers, but they are not a safety system. Internal protection is what keeps your items intact. Pack as if the label will never be read.
Key takeaways
Proper fragile-item packing requires the right box, a cushioning layer on all six sides, individual wrapping with 3–5 bubble-wrap layers, and H-tape sealing before any label is applied.
| Point | Details |
|---|---|
| Box fit and construction | Use a correctly sized new double-wall box; excess void space causes movement and breakage. |
| Immobilize, don’t just cushion | Fill all voids so the item cannot shift; the shake test confirms this before sealing. |
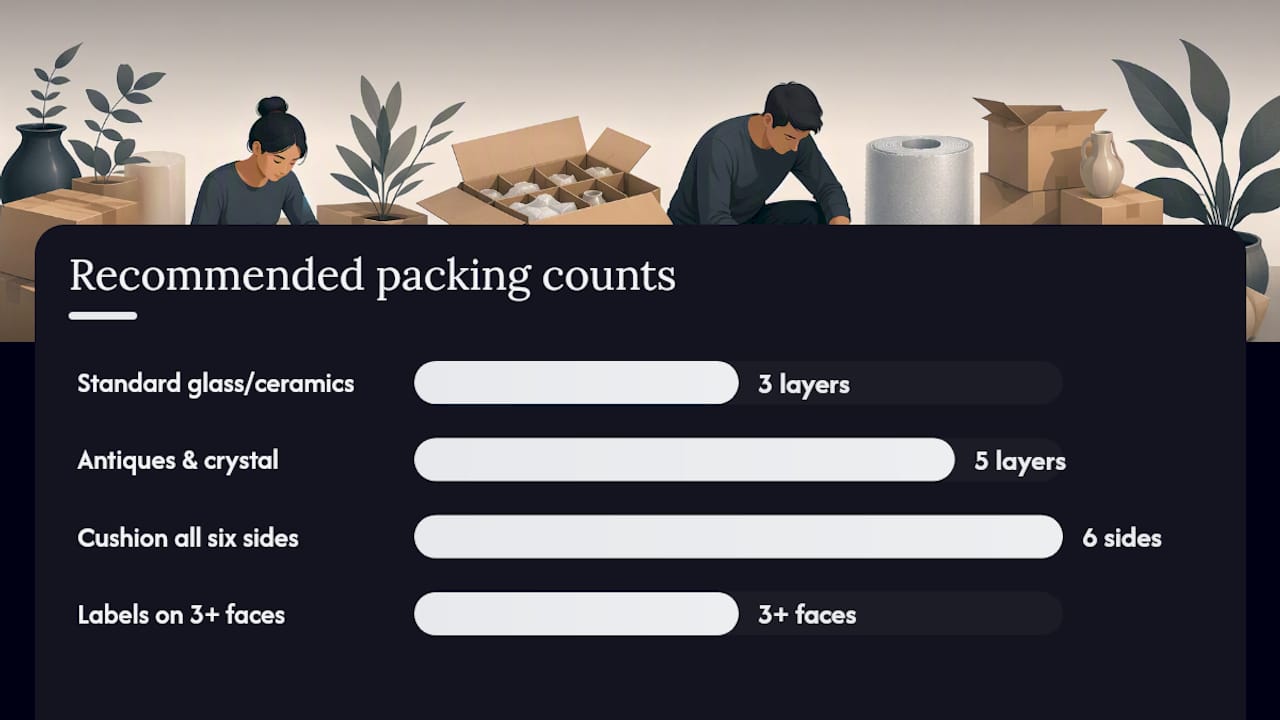
| Layer count matters | Three bubble-wrap layers for standard glass and ceramics; five for antiques and crystal. |
| Double-box high-value items | Place the sealed inner box in a larger outer box with 2 inches of cushioning on all six sides. |
| Labels are alerts, not protection | Apply “Fragile” and “This Side Up” on three or more faces, but rely on internal packing for safety. |
| Aleksmoving for complex items | Professional packing, custom crating, and flat-rate pricing protect your most valuable pieces. |
Table of Contents
- What packing materials do you need, and where do you get them in Canada?
- Your step-by-step guide to packing fragile items on moving day
- How do you pack specific fragile categories?
- Why immobilization matters more than cushioning alone
- How do you reinforce boxes and when should you double-box?
- How should you label boxes and what can labels actually do?
- When should you hire professional packers?
- Your packing day checklist and staging tips
- What we have learned from packing fragile items on the job
- Aleksmoving handles your fragile items with care
- Sources
What packing materials do you need, and where do you get them in Canada?
Good packing materials fall into four functional groups. Knowing which material does which job prevents over-buying and under-protecting.
Surface protection: Bubble wrap (small-cell for glass, large-cell for ceramics and artwork), unprinted packing paper, and foam pouches or sheets. Avoid newspaper for direct contact with items since the ink transfers and can stain.
Void fill: Packing peanuts, air pillows, and crumpled packing paper all work. The goal is to eliminate movement inside the box, not simply to fill space.
Structural support: New double-wall corrugated boxes, dish-pack cartons with built-in cell dividers, and flat mirror/picture boxes. For antiques or declared-value items, tri-wall boxes or custom wooden crates add another level of protection.
Sealing and labelling: 2-inch reinforced polypropylene tape, a tape gun, and pre-printed handling labels. Masking tape and household tape are not strong enough for stacked loads.
Where to buy in Canada: Home Depot, Staples, U-Haul, and most Canadian Tire locations carry the basics. For specialty items like dish-pack cartons, foam corner guards, or mirror boxes, moving-supply retailers and Aleksmoving’s own packing service can source them directly. Buying new boxes rather than sourcing used ones from grocery stores is worth the cost for anything fragile or valuable.
Pro Tip: Buy one size smaller than you think you need for heavy fragile items like dishes and books. Smaller boxes limit weight per carton, which reduces the chance of a bottom failure mid-carry.
| Material | Best for | Key advantage | Watch out for |
|---|---|---|---|
| Small-cell bubble wrap | Glassware, crystal, ceramics | Conforms to curves, absorbs shock | Thin layers tear; use 3–5 wraps |
| Foam sheets / pouches | Plates, picture frames, electronics | Scratch-free surface contact | Does not cushion heavy impacts alone |
| Unprinted packing paper | Void fill, secondary wrap layer | Cheap, flexible, recyclable | Compresses over time; top up voids |
| Double-wall corrugated box | All fragile items | Resists stacking pressure | Loses strength when wet or reused |
| Dish-pack carton with dividers | Stemware, glasses, mugs | Cells prevent contact between pieces | Heavier than standard boxes |
| Air pillows / packing peanuts | Void fill around wrapped items | Lightweight, easy to adjust | Peanuts shift; check after sealing |
| 2″ reinforced packing tape | Sealing all boxes | Holds H-tape pattern under load | Cheap tape peels at seams |
Your step-by-step guide to packing fragile items on moving day
Follow this workflow in order. Skipping steps is where most DIY packs go wrong.
- Choose the right box. Match the box size to the item, not the other way around. A box that is too large creates excess void space that is hard to fill completely, and the item will shift. AmesonPak’s guide stresses that correct sizing is one of the most overlooked steps. Use new double-wall boxes for anything heavy or declared-value; single-wall is acceptable only for lightweight, low-risk items.
- Reinforce the box bottom. Run tape along the centre seam and across both short ends before placing anything inside. This is the H-tape pattern applied to the bottom, and it prevents seam failure when the box is lifted or stacked.
- Lay down a base cushion. Add a couple of inches of crumpled packing paper or foam at the bottom of the box. This base layer absorbs impact from drops and is non-negotiable for anything breakable.
- Wrap each item individually. Start with a sheet of packing paper, then add bubble wrap. For standard glassware and ceramics, three full wraps of bubble wrap is the professional minimum. For antiques, crystal, or anything irreplaceable, apply five layers and run the firm-pressure test: press the wrapped item firmly in your hand. If you can feel a hard edge, add more wrap until you cannot.
- Place the item in the inner box and fill all voids. Horizon Pack and Ship recommends a cushioning layer on all six sides. Pack heavier items at the bottom, lighter ones on top. Never leave gaps.
- Perform the shake test. Close the box flaps without taping and give it a gentle shake. Any movement or sound means more filler is needed. Most DIY packs fail this check the first time.
- For high-value items, double-box. Place the sealed inner box inside a larger outer box with a cushioning layer between them on all six sides. DHL’s packing guidelines recommend this for fragile and high-value shipments.
- Seal with H-tape. Run tape down the centre seam and across both short ends on the top. Repeat on the bottom. This pattern distributes stress across the box and resists seam failure under stacking loads.
- Label every face. Write “Fragile,” “This Side Up,” and the destination room on at least three sides.
Pro Tip: Photograph every wrapped item before it goes into the box. If a claim is needed later, that photo is your evidence. Horizon Pack and Ship lists pre-pack photography as a standard professional practice.
How do you pack specific fragile categories?
Different shapes and vulnerabilities call for different micro-techniques. Here is what works for the most common fragile categories.
Glassware and stemware
Pack glasses and stemware upright, never on their sides. Upright placement distributes weight through the strongest axis of the glass. Use a dish-pack carton with built-in cell dividers so pieces never touch each other. For stemware with long, thin stems, stuff the bowl with crumpled paper before wrapping to prevent the stem from snapping under pressure. Division 1 Moving specifically recommends dividers for stemware and upright placement as the two most effective breakage-prevention steps.
Dishes and plates
Wrap each plate individually in packing paper, then bubble wrap. Pack them vertically, standing on edge like records in a crate, rather than stacking them flat. Vertical packing spreads the load across the plate’s strongest axis and removes the stacking pressure that cracks flat-packed plates. Use corrugated dividers or foam sheets between pieces as a secondary barrier. Keep the box weight under about 18 kg (40 lbs) by using smaller cartons.
Electronics and screens
Screens and circuit boards are vulnerable to static discharge as much as physical impact. Use anti-static bubble wrap (pink or black) for direct contact with electronics, not standard clear wrap. Pack monitors and TVs upright, never face-down. Secure cables in labelled bags separately. If you kept the original packaging, use it — it was engineered for that exact item.
Original packaging aside, a snug double-wall box with foam inserts cut to fit is the next best option. Capitol Moving’s guide recommends double-boxing for high-value electronics just as it does for antiques.
Artwork, mirrors, and framed pieces
Use foam corner guards on all four corners before wrapping. Flat mirror boxes or picture boxes sized to the frame are the right structural choice. For canvases, a layer of glassine paper against the surface prevents paint transfer, followed by bubble wrap. Mark the box “This Side Up” and “Do Not Stack” on every face. For large or very valuable pieces, a custom wooden crate is the professional standard.
Antiques and odd shapes
Document the condition of every antique with photographs before you touch the packing materials. Odd shapes are the hardest to immobilize because standard void fill shifts around irregular surfaces. Custom foam inserts cut to the item’s profile, or a box-in-box approach with foam blocking on all sides, solves this. For anything truly irreplaceable, professional custom crating is the right call. Capitol Moving and Division 1 Moving both recommend professional crating for antiques and high-declared-value pieces.
Pro Tip: For long-distance moves across Ontario or between provinces, add one extra wrap layer to every item. Longer transit means more handling points and more vibration.
Why immobilization matters more than cushioning alone
Cushioning softens an impact. Immobilization prevents the impact from happening in the first place. Most packing guides focus on softness, but the real goal is to stop the item from moving at all inside the box.
The professional layering standard is three full wraps of bubble wrap for standard glass and ceramics, and five wraps for very delicate or antique pieces. After wrapping, apply the firm-pressure test: grip the wrapped item and press firmly. If you can feel any hard edge through the wrap, add another layer. Repeat until the test passes.
Once the item is in the box, the shake test confirms immobilization. Close the flaps and shake gently. Any sound or movement means the void fill is insufficient. Add more filler, retest, and only seal when the box is silent and still. AmesonPak and Horizon Pack and Ship both list the shake test as a required final check before sealing.
The 2-inch minimum cushioning rule applies to all six sides of the inner item, not just the top and bottom. Sides and corners take significant force during loading and transit, and a thin side wall is where most in-transit breaks occur.
Pro Tip: If you are packing for a long-distance move, treat every box as if it will be placed at the bottom of a stack. That mental shift changes how firmly you fill voids.
How do you reinforce boxes and when should you double-box?
Box reinforcement starts before anything goes inside. Run H-tape on the bottom (centre seam plus both short ends) before loading. For heavier fragile items, add a second strip of tape across the centre of each short end for extra corner support.
New double-wall boxes are the right choice for fragile or heavy loads. Recycled boxes lose compression strength with each use, and that loss is invisible from the outside. For items with a declared value or anything you cannot replace, the cost of new double-wall boxes is negligible compared to the risk.
When to double-box:
- The item has a declared value above your carrier’s or mover’s standard coverage threshold
- The item has an irregular shape that is hard to immobilize in a single box
- The item is exceptionally fragile (antique glass, crystal, fine china)
- The outer dimensions of the item leave less than 2 inches of clearance to the box wall
To size the outer carton, add at least 4 inches to each dimension of the inner box (2 inches per side). Fill the gap between inner and outer box with foam or packing paper on all six sides. DHL’s guidelines specify this 2-inch gap as the minimum for double-box protection.
Pro Tip: Seal the inner box completely before placing it in the outer box. If the outer box is ever opened during transit, the inner box still protects the item.
How should you label boxes and what can labels actually do?
Labels are a communication tool, not a protection system. That distinction matters. A box labelled “Fragile” with no internal cushioning will break just as reliably as an unlabelled one. AmesonPak is direct on this point: labels alert handlers but do not prevent damage.
Label placement best practice:
- Apply “Fragile” labels to at least three faces of the box (top, front, and one side).
- Add “This Side Up” arrows on all four vertical faces for anything with a clear orientation.
- Write the destination room on the top and one side so movers can stack and route boxes without opening them.
- For double-boxed items, label both the inner and outer box.
Practical handling notes for your move:
- Keep fragile boxes under 18 kg (40 lbs). Heavier boxes get set down harder.
- Never stack non-fragile boxes on top of fragile ones during loading. Communicate this to your movers before the truck is loaded.
- Tell your mover verbally which boxes contain fragile items and point them out during the walkthrough.
- For a long-distance move, ask your mover how fragile boxes will be positioned in the truck. They should be loaded last, placed on top, and secured against shifting.
When should you hire professional packers?
Some items are worth handing to a professional. The decision comes down to four factors: monetary value, irreplaceability, complexity of shape, and the time you have available. For detailed practical removalist-focused packing guidelines that align with immobilisation and cushioning best practices, see Going Home – Furniture Removal Packing Materials and Packing Guidelines – BulkyWaste.
Hire professional packers when:
- An item’s replacement cost exceeds what you are comfortable risking on a DIY pack
- The item is irreplaceable (family heirlooms, original artwork, antiques)
- The shape is irregular enough that standard void fill cannot immobilize it reliably
- You are moving long-distance or across provinces, where transit time and handling points multiply
What professionals add goes beyond materials. Experienced packers use custom foam inserts, wooden crates, and purpose-built cartons that are not available at retail. They also understand the role movers play in fragile item transport and can document condition before and after packing for insurance purposes.
Insurance and declared value in Canada: When declaring a higher value for fragile items with a Canadian carrier or moving company, confirm their packing requirements first. Many carriers require double-boxing or a minimum cushioning standard for higher declared values, and may deny claims if those standards were not met. LateShipment notes that improper packing is among the most common reasons carriers deny damage claims. Packing to the carrier’s stated standard is the most reliable way to protect a claim.
Before your move, check these insurance points:
- Ask your mover for their declared-value coverage tiers and per-item limits
- Confirm whether professional packing by the mover is required for full coverage
- Photograph every high-value item before it is packed
- Keep receipts or appraisals for antiques and artwork in a separate folder
Pro Tip: For antiques and high-value art, ask your mover specifically about custom crating for long-distance moves. A wooden crate built to the item’s dimensions is the only method that truly eliminates movement.
Your packing day checklist and staging tips
A dedicated staging area speeds the process and reduces errors. Set up a packing table at counter height, keep your tape gun, markers, and labels within arm’s reach, and work through one category of item at a time.
Before you start packing:
- Gather all materials (boxes, bubble wrap, paper, tape, labels, markers).
- Photograph every fragile item before wrapping.
- Reinforce all box bottoms with H-tape before loading anything.
Per-item steps:
- Wrap in packing paper first, then bubble wrap (3 layers minimum, 5 for delicate pieces).
- Apply the firm-pressure test. Add wrap if any edge is detectable.
- Place in box on a base cushion of 2–3 inches.
- Fill all voids to achieve 2 inches of cushioning on all sides.
- Perform the shake test. Add filler if any movement is present.
- Seal with H-tape top and bottom.
- Label all faces.
Staging and organisation tips:
- Pack fragile items last so they load last and unload first.
- Group boxes by destination room and stack fragile boxes separately from general boxes.
- Keep a written or photo inventory of what is in each fragile box.
- Estimate roughly 10–15 minutes per fragile item for a careful DIY pack. A professional packer works faster with better materials.
Pro Tip: Pack a “first open” box with the items you will need immediately on arrival (kettle, a few mugs, phone charger). This prevents you from tearing open fragile boxes looking for everyday items.
What we have learned from packing fragile items on the job
The single most consistent mistake we see in DIY packs is confusing “wrapped” with “immobilized.” A beautifully wrapped wine glass sitting loose in a half-empty box will break just as reliably as one with no wrap at all. The wrap protects the surface; the void fill and box fit protect the item from movement. Both are required, and neither substitutes for the other.
The second pattern we see regularly is over-reliance on labels. Movers read labels and try to honour them, but a truck in transit is a dynamic environment. Boxes shift, get stacked, and sometimes get set down harder than intended. The only reliable protection is what is inside the box.
For high-value items, antiques, or anything with sentimental weight, the honest advice is to let professionals handle the packing. The materials, the technique, and the experience all matter, and the cost of professional packing is almost always less than the cost of replacing what breaks.
Aleksmoving handles your fragile items with care
Packing fragile items properly takes the right materials, the right technique, and enough time to do it carefully. When the items are valuable, irreplaceable, or simply too important to risk, Aleksmoving’s professional packing team handles every step: individual wrapping, custom crating for antiques and artwork, double-boxing for declared-value pieces, and full documentation before and after.
With over 18 years of experience and flat-rate pricing with no hidden fees, we give you a clear picture of cost before we start. Our team serves clients across Ontario and broader regions in Canada, covering local moves, long-distance relocations, and specialty fragile-item transport.
Whether you need a full packing service or just want a professional to handle your most fragile pieces, we are ready to help. Request a free quote and tell us what needs protecting. We will take it from there.
Sources
The sources below cover carrier packing standards, step-by-step techniques, and Aleksmoving’s own service pages for fragile-item moves in Canada.
- How to pack fragile items | DHL Express
- How to Pack Fragile Items So They Actually Arrive Intact (2026 Packing Guide) | Horizon Pack and Ship
- How To Pack Fragile Items Safely: A Complete Guide | Capitol Moving
- How to Pack Fragile Items: The Expert Guide to Stress-Free Moving | Division 1 Moving
- How to Pack Fragile Items for Shipping: A Complete Guide | AmesonPak